Using AWS SQS Queues in C# and .Net 6

Introduction
This is the third article in the 'To-Do List' series. You do not need to follow the series to follow this tutorial, but you may find that some parts of the tutorial refer to previous articles.
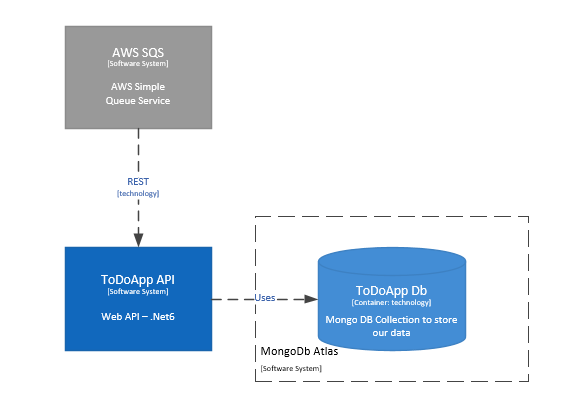
Here, I am going to extend my application to include an SQS queue we can use to add new items to our lists. This gives us an option to add items to our list from anywhere without having to expose our API to the public.
The architecture at the completion of this article will look like the below:
All code for relating to this tutorial can be found on GitHub here.
Setting up the SQS Queue
Create a User Account
If you have not already set up an AWS account, you can register for one here. At the time of writing, all the tools we're using in this article fall within the Free Tier, so there should be no costs associated, but you should confirm this.
Once you have an AWS account, the first thing to do is set up a new IAM account that our API will use to read/write to the queue.
Go into the IAM service and select 'Add User'. Provide a username and ensure the 'Access key...' option is selected:
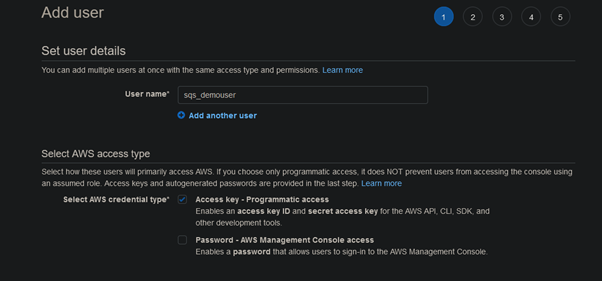
Click through to the final page, and make a note of the access key and the secret key, as we will need these later. Click 'Close'. Then, you should be able to go back into the 'Users' screen and select the user we have just created. Make a note of the ARN value for our user.
Create the SQS Queue
Now we have a user, we can go into the SQS service and select 'Create Queue'.
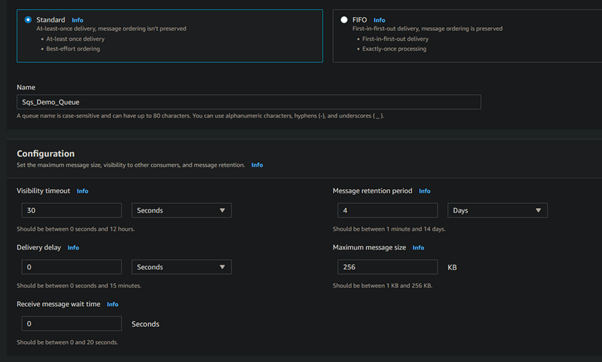
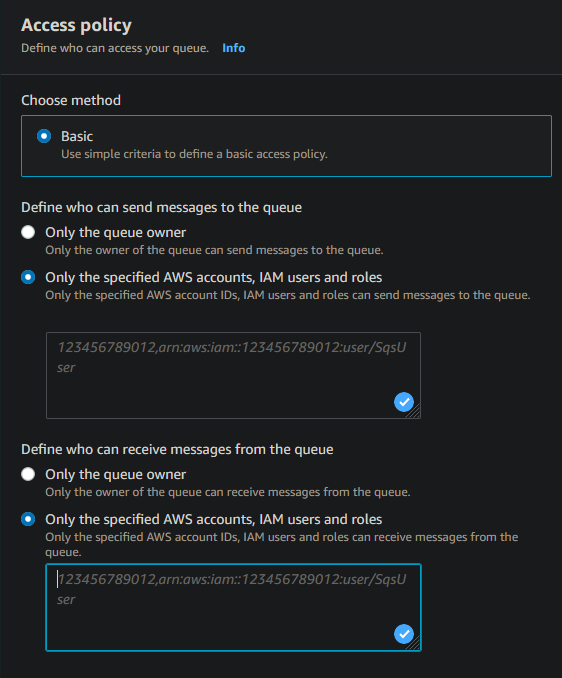
Give the queue a name, and then scroll down to the 'Access policy' section. We can leave the method as 'Basic', and then when we want to define who can send and who can receive to the queue, select 'Only the specified AWS accounts, IAM users and roles' and enter the ARN value for the user we created (above). Make sure this is done for both send and receive.
Once the queue is created, make a note of the name, ID and region the queue exists in. We will need these to configure our API.
Adding the SQS Code to our API
Creating the Options
We will use the Options pattern to import our queue configuration into our API. We can add the following into our appsettings.json, filling in the values we have previously obtained:
"SqsOptions" : {
    "SqsRegion" : "",
    "SqsQueueId" : "",
    "SqsQueueName" : "",
    "IamAccessKey" : "",
    "IamSecretKey" : ""
  }
And create a new 'SqsOptions' class to match:
public class SqsOptions
{
    public string SqsRegion { get; set; }
    public string SqsQueueId { get; set; }
    public string SqsQueueName { get; set; }
    public string IamAccessKey { get; set; }
    public string IamSecretKey { get; set;}
}
We can then simply add the below line to our Program.cs to import the options into our API dependency injection container:
builder.Services.Configure<SqsOptions>(builder.Configuration.GetSection("SqsOptions"));
Creating an SQS Client Factory
I will use the factory pattern here, in the same way as I did previously for the data access connection in my previous post. This allows us to separate out the code that depends on the external AWS library to a minimal class, and makes the main SQS service more testable.
The factory is responsible for taking the SQS Options and configuring the client for connecting to the queue. I have also extracted an interface for this, code of which can be found in the GitHub repository.
public class SqsClientFactory : ISqsClientFactory
{
    private readonly IOptions<SqsOptions> _options;

    public SqsClientFactory(IOptions<SqsOptions> options)
    {
        _options = options;
    }

    public IAmazonSQS GetSqsClient()
    {
        var config = new AmazonSQSConfig
        {
            RegionEndpoint = RegionEndpoint.GetBySystemName(_options.Value.SqsRegion),
            ServiceURL = $"https://sqs.{_options.Value.SqsRegion}.amazonaws.com"
        };

       return new AmazonSQSClient(_options.Value.IamAccessKey, _options.Value.IamSecretKey, config);
    }

    public string GetSqsQueue() =>
        $"https://sqs.{_options.Value.SqsRegion}.amazonaws.com/{_options.Value.SqsQueueId}/{_options.Value.SqsQueueName}";
}
The factory is then added to the Program.cs as follows:
builder.Services.AddSingleton<ISqsClientFactory, SqsClientFactory>();
The SQS Service
The SQS Service is primarily designed to take messages off the SQS Queue, deserialise them back into a list of To-Do Items and return them to the calling service. For our service, we have also included the functionality to drop messages onto the queue, which should allow us to test the end-to-end process.
The SQS Service calls the SQS Factory to obtain a client and then uses that client to add and retrieve messages. Again an interface has been added but excluded from here for brevity.
public class SqsService : ISqsService
{
    private readonly ISqsClientFactory _sqsClientFactory;

    public SqsService(ISqsClientFactory sqsClientFactory)
    {
        _sqsClientFactory = sqsClientFactory;
    }

    public async Task<IEnumerable<ToDoItemModel>> GetToDoItemsAsync()
    {
        var messages = new List<ToDoItemModel>();

        var request = new ReceiveMessageRequest
        {
            QueueUrl = _sqsClientFactory.GetSqsQueue(),
            MaxNumberOfMessages = 10,
            VisibilityTimeout = 10,
            WaitTimeSeconds = 10,
        };

        var response = await _sqsClientFactory.GetSqsClient().ReceiveMessageAsync(request);

        foreach (var message in response.Messages)
        {
            try
            {
                var m = JsonSerializer.Deserialize<ToDoItemModel>(message.Body);
                if(m != null)
                    messages.Add(m);
            }
            catch
            {
                // Invalid message, ignore
            }
        }

        return messages;
    }

    public async Task PublishToDoItemAsync(ToDoItemModel item)
    {
        var request = new SendMessageRequest
        {
            MessageBody = JsonSerializer.Serialize(item),
            QueueUrl = _sqsClientFactory.GetSqsQueue(),
        };

         var client =  _sqsClientFactory.GetSqsClient();
         await client.SendMessageAsync(request);
    }
}
We can then drop this into our Program.cs:
builder.Services.AddTransient<ISqsService, SqsService>();
Putting it all Together
For this demonstration, I am just going to create a simple controller that allows us to push a message onto the queue, and then check the queue for messages and for any it finds, write them into our database. I will also return the number of messages found so we can see something has happened:
[Route("[controller]")]
public class SqsController : ControllerBase
{
    private readonly ISqsService _sqsService;
    private readonly IToDoItemService _toDoItemService;

    public SqsController(ISqsService sqsService, IToDoItemService toDoItemService)
    {
        _sqsService = sqsService;
        _toDoItemService = toDoItemService;
    }

    [HttpPost("Create")]
    public async Task<IActionResult> PublishToDoItem([FromBody] ToDoItemModel model)
    {
        try
        {
            await _sqsService.PublishToDoItemAsync(model);
            return Ok();
        }
        catch (Exception ex)
        {
            return BadRequest(ex.Message);
        }
    }

    [HttpGet("Retrieve")]
    public async Task<IActionResult> RetrieveToDoItems()
    {
        try
        {
            var items = await _sqsService.GetToDoItemsAsync();

            foreach (var item in items)
            {
                await _toDoItemService.CreateItemAsync(item);
            }

            return Ok(items.Count());
        }
        catch (Exception ex)
        {
            return BadRequest(ex.Message);
        }
    }
}
When we launch our application, we can navigate to the swagger page and send a new request to the 'Create' endpoint on our SQS controller:
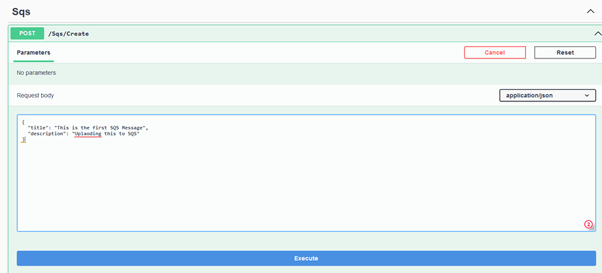
This should publish our To-Do item onto our queue. All being well, we should get a 200 OK response.
We can then make a call to our 'Retrieve' endpoint. This should pull any messages down from the queue and push them into our database. Note: Depending on the set-up, you can specify the maximum number of messages to retrieve in a single request.
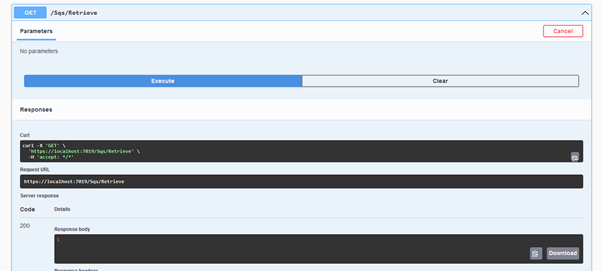
Here we can see we have pulled down the single item we have added to our queue, and a 1 is displayed as the response.
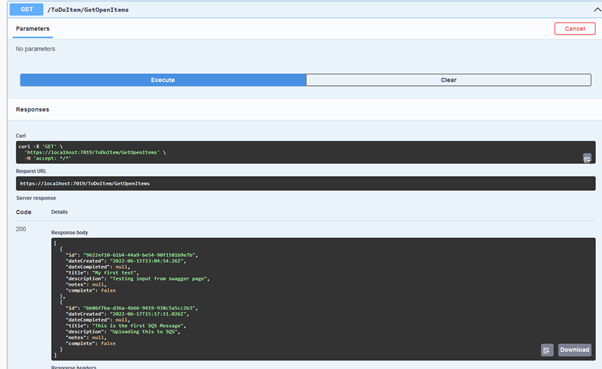
To verify we have then added this to our database, we can call the 'GetOpenItems' endpoint on our 'ToDoItem' controller and we should see our new item along with any previous items we have created appear in our list:
Summary
This covers the basic steps to reading and writing from an SQS Queue. We currently haven't implemented a way to continuously poll for our new items. This will be covered in a separate article, where we can add a recurring job to Hangfire, that we previously configured to allow us to monitor our queue.