Using Hangfire and MongoDB for Scheduling in .Net 6

Introduction
This is the first in my series of articles, which aims to build a working ‘To-Do’ list application whilst exploring a whole range of different technologies and frameworks.
A bit more background is given in my introduction page.
To start with, I am going to create the initial building blocks for our application, which in this case consists of a .Net 6 Web API, and MongoDB back end to store our to-do items, and I’m also going to include a Hangfire job scheduler which will be used in later articles as we look to expand the architecture.
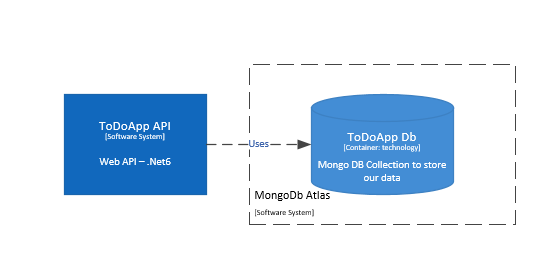
I will also include some C4 modelling as we expand the architecture to show where we are in the process of building this application. The initial model will simply look like:
All source for this is available on GitHub here.
What is Hangfire?
Hangfire is an open-source background processing and scheduling library for .Net applications. It is a great tool for running regular or long-running jobs in the background, and can even be used in asp.net web applications. It can support multiple instances of an API, so workloads can be scaled up or down, and multiple queues of differing priorities used if required.
Furthermore, it is also quite extensible, there are many additional libraries which can be used with Hangfire, and you are always free to write your own. In this tutorial, we will use Mongo DB as the persistent storage medium for Hangfire instead of the default SQL Server implementation.
We will also use the Hangfire Dashboard which provides a decent user interface for observing Hangfire jobs, and the Hangfire Console, as this is a great extension for allowing us to output more information to the UI when a job is running.
What is MongoDB?
Mongo DB is an open-source NoSQL database. NoSQL databases support storing data in ‘documents’, in Mongo DB’s case these documents are stored as JSON objects.
NoSQL databases are by their nature very fast and scalable, and good for storing unstructured data. They offer an alternative to traditional SQL databases, which have a more rigid structure. Whilst NoSQL databases are quick, because they are unstructured in nature, they do not have the same concept of relationships like JOIN's and so are not suitable for more relational data.
Getting started with Mongo DB
To get started with Mongo DB you can create a free Mongo Atlas Database in the cloud at https://www.mongodb.com/atlas/database. From there you can use the quick start tool to create a shared cluster, select a host and region and some credentials, as well as restrict access to certain IP addresses if you wish.
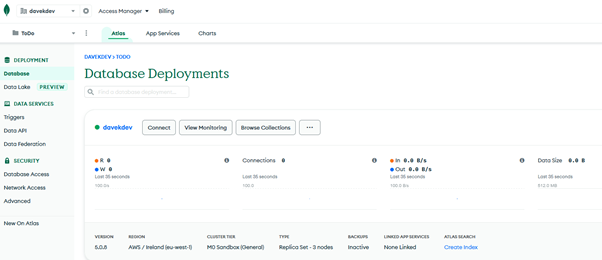
Once you have created your account and first database, you should see your deployments as below:
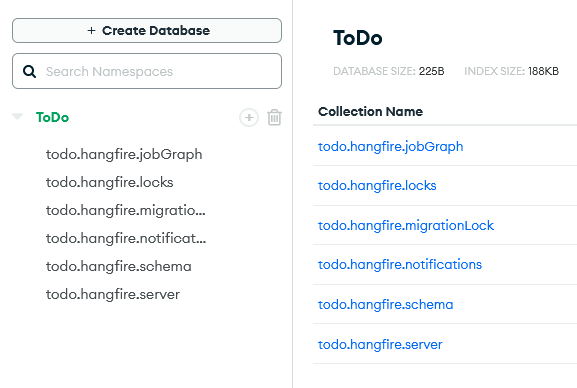
You can then select 'Browse Collections' and it will ask you to create your first database and collection. In this example, I have created a database and collection, both called 'ToDo'.
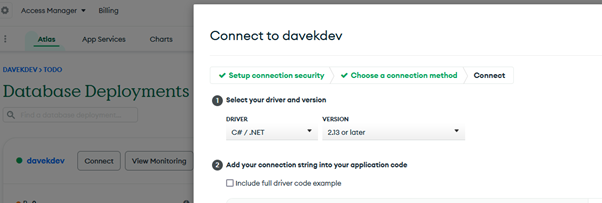
Once we have a database, we can then select the 'Connect' button, change the Driver to C# and select the latest version (2.13 at the time of writing). This will generate our connection string for us:
Save this for later use. The connection string will also be missing the database name, so when we come to use it later, we must remember to include this between the '/' and the '?' towards the end of the connection string.
Building the .Net 6 API
If you haven’t the latest .net SDK installed, this can be downloaded from https://dotnet.microsoft.com/en-us/download.
Create a folder for the new project and then create a new C# web API project with the command:
dotnet new webapi -n [project name]
Open the '.csproj' with your IDE of choice. I prefer Rider from JetBrains, but Visual Studio Community or any other compatible IDE would be fine.
Install Libraries
We’re going to need to install a few packages from Nuget to get started with MongoDB and Hangfire:
- MongoDB.Driver
- Hangfire
- Hangfire.Console
- Hangfire.Mongo
These should be enough to get us started, and they will automatically pull in any additional package dependencies they require.
Set up Hangfire
To add Hangfire, we can create a new static ‘HangfireService’ with the following 'ConfigureHangfireService' extension method. I've added this to a 'StartUp' directory within the project, but you can structure the project however you feel works for you. Make sure to include the ‘UseConsole()’ call to activate the Hangfire Console we will use later:
public static class HangfireService
{
    public static void ConfigureHangfireService(this WebApplicationBuilder builder)
    {
        var mongoUrlBuilder = new MongoUrlBuilder(builder.Configuration.GetValue<string>("ConnectionStrings:MongoDb"));
        var mongoClient = new MongoClient(mongoUrlBuilder.ToMongoUrl());

        builder.Services.AddHangfire(configuration => configuration
            .SetDataCompatibilityLevel(CompatibilityLevel.Version_170)
            .UseSimpleAssemblyNameTypeSerializer()
            .UseRecommendedSerializerSettings()
            .UseConsole()
            .UseMongoStorage(mongoClient, mongoUrlBuilder.DatabaseName, new MongoStorageOptions
            {
                MigrationOptions = new MongoMigrationOptions
                {
                    MigrationStrategy = new MigrateMongoMigrationStrategy(),
                    BackupStrategy = new CollectionMongoBackupStrategy()
                },
                Prefix = "todo.hangfire",
                CheckConnection = false
            })
        );

        builder.Services.AddHangfireServer(serverOptions =>
        {
            serverOptions.ServerName = "ToDo.Hangfire";
        });
    }
}
If you are using Atlas, you may need to ensure the 'CheckConnection' value is set to false as above, or Hangfire may time out before it completes the initial connection.
Note: If you are using a non-clustered Mongo DB collection, you may need to set the queue job strategy as follows in the above config:
CheckQueuedJobsStrategy = CheckQueuedJobsStrategy.TailNotificationsCollection
We then need to add a new connection string to our appSettings.json file, be sure to include the collection name you created earlier between the / and the ?:
"ConnectionStrings": {
    "MongoDb" : "<Your connection string here>"
  }
And then we can update our Program.cs file as follows to add the Hangfire service and dashboard with the following lines:
builder.ConfigureHangfireService();
app.UseHangfireDashboard();
If we now launch our application, we should see the Hangfire collections added to the database we have previously created in Mongo DB:
And be able to visit the Hangfire dashboard running on https://localhost:/hangfire
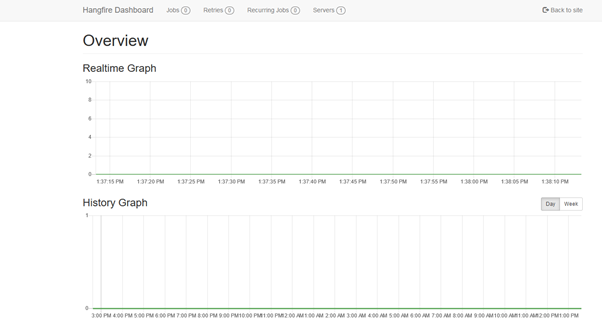
Note: In the footer of the dashboard, you should also be able to see the sanitised connection string, so you know it’s connecting to the correct database.
Creating a Hangfire job and viewing output on the console
To demonstrate how we can schedule a job and output some information to the Hangfire console, for now I’m just going to create a simple job that executes on a Cron schedule that outputs the current date and time and the current UTC date and time.
Firstly, we can create a simple jobs class as below, and to use the console we pass in a ‘PerformContext’ parameter. This will be injected by Hangfire, so we don’t need to pass anything other than null.
public class Jobs : IJobs
{
    [Queue("default")]
    [JobDisplayName("Display current date and time")]
    public void DisplayCurrentDateTime(PerformContext context)
    {
        context.WriteLine($"The current date and time is: {DateTime.Now.ToString(CultureInfo.CurrentCulture)}");
        context.WriteLine($"The current UTC date and time is: {DateTime.UtcNow.ToString(CultureInfo.CurrentCulture)}");
    }
}
We then need to create an interface for the Jobs class, so we can add to our dependency injection container.
public interface IJobs
{
    void DisplayCurrentDateTime(PerformContext context);
}
builder.Services.AddTransient<IJobs, Jobs>();
And finally, create a configuration class where we can configure the job to get added to the scheduler along with the schedule, in this case a Cron schedule to run every 5 minutes:
public static class HangfireJobConfiguration
{
    public static void ConfigureJobs(this WebApplication app)
    {
        app.Services.CreateScope();

        RecurringJob.AddOrUpdate(() => app.Services.GetService<IJobs>().DisplayCurrentDateTime(null),
            "*/5 * * * *");
    }
}
which can be hooked up to our 'PRogram.cs' by calling
builder.ConfigureHangfireService();
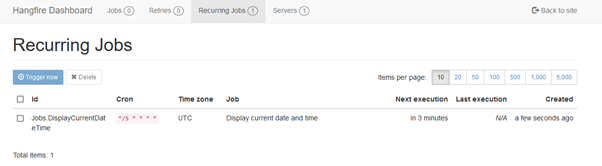
By launching our application, and going to the Hangfire Dashboard, we should see our job appear on the 'Recurring Jobs' tab, in this case to execute every 5 minutes:
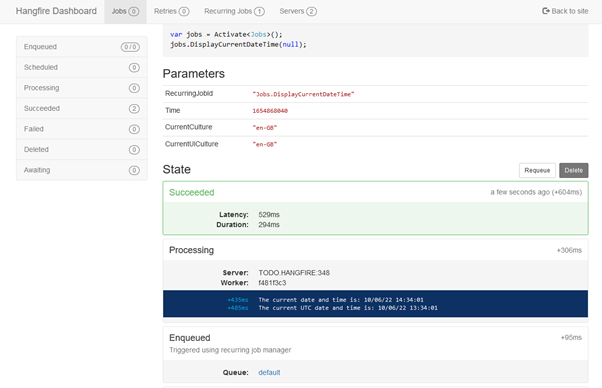
And if we view the job details after it has successfully completed, we should see the expected output on the Hangfire console:
Summary
We have now configured our API to connect to Mongo DB and included the Hangfire scheduler with the Hangfire Dashboard and Hangfire Console. We can create jobs and add them to our API to execute on a schedule.
Whilst the current job is not of much use in a real world scenario, we will revisit this later where we will use the scheduler for a number of different tasks.